
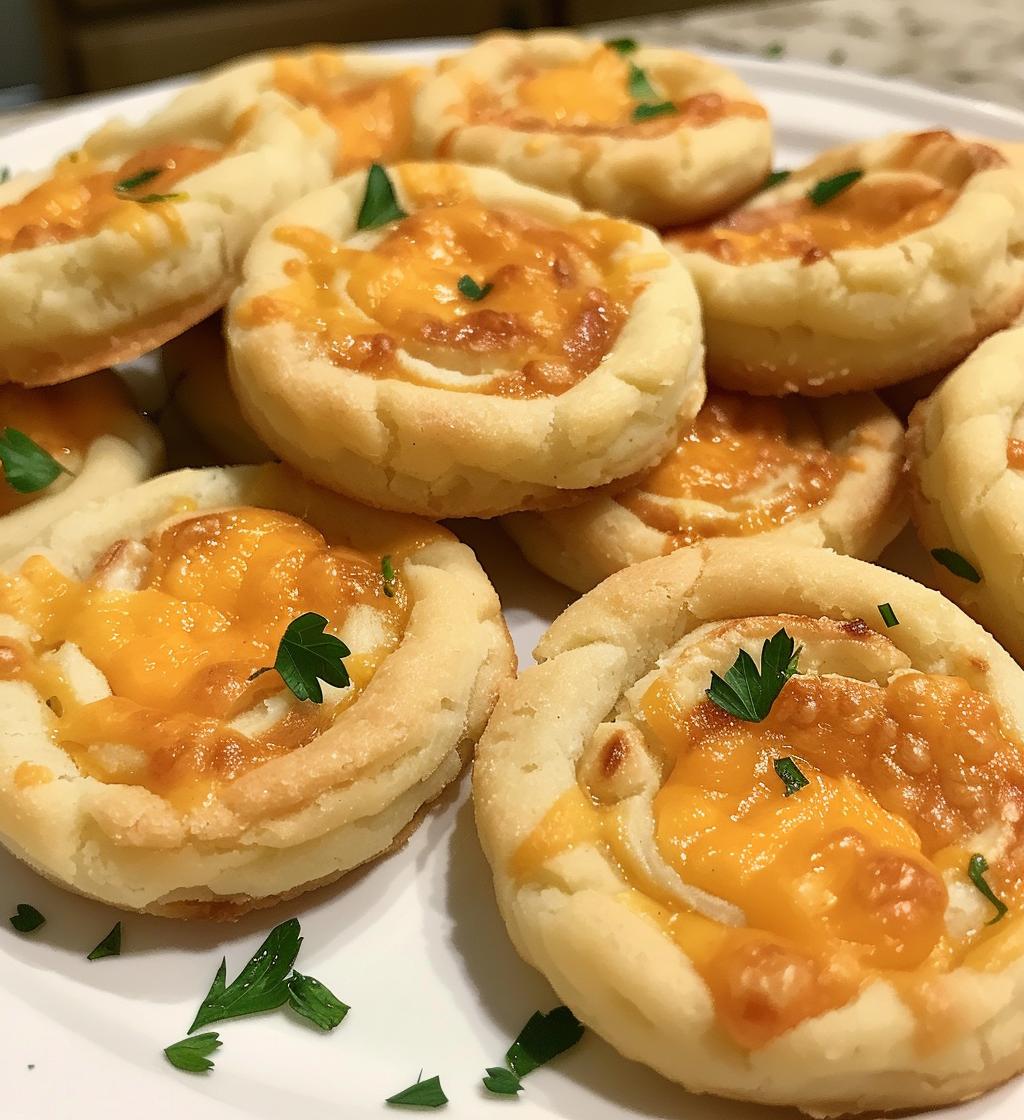
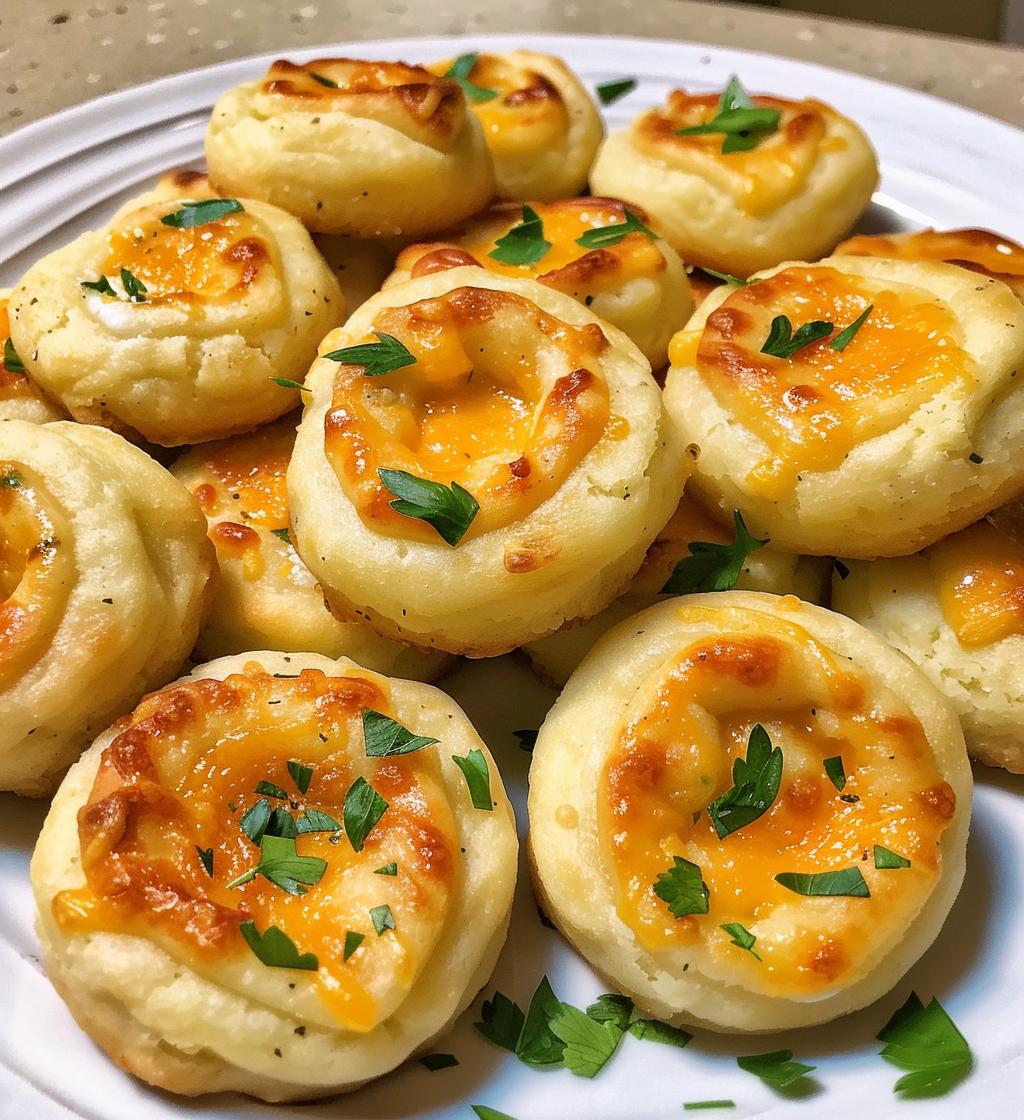
Oh my goodness, let me tell you about these Cheesy Thumbprint Appetizers! They’re the perfect little bites that bring joy to any gathering. Imagine buttery dough cradling a creamy, cheesy filling that’s bursting with flavor! Seriously, they’re so good, you won’t be able to stop at just one. What I love most is how easy they are to whip up—like, you can have them ready in about 35 minutes! They’re the ultimate combination of creamy cheese, fresh herbs, and a hint of garlic, all nestled in a soft, golden crust. Plus, they’re super versatile, so you can get creative with different cheeses or add your favorite herbs. Trust me, these cheesy delights will be the star of your appetizer spread!
Ingredients for Cheesy Thumbprint Appetizers
Alright, let’s gather what we need to make these delightful cheesy bites! Here’s the lowdown on the ingredients:
- 1 cup cream cheese, softened – Make sure it’s nice and soft so it mixes well. Trust me, no one wants lumps in their filling!
- 1 cup shredded cheddar cheese – I love using sharp cheddar for that extra kick, but feel free to choose your favorite!
- 1/2 cup grated Parmesan cheese – This adds a lovely nutty flavor that really enhances the overall taste.
- 1/4 cup fresh parsley, chopped – Fresh herbs make a world of difference, and parsley adds a pop of color!
- 1/2 teaspoon garlic powder – A little garlic goes a long way in elevating the flavor. If you’re a garlic lover like me, you might even want to add a touch more!
- 1/4 teaspoon black pepper – Just enough to give it a slight kick, but not overpowering.
- 1 package refrigerated dough – This is where the magic happens! You can use crescent roll dough or any pre-made dough you like for a super easy base.
Gather all these goodies, and you’ll be well on your way to making some delicious cheesy thumbprint appetizers!
How to Prepare Cheesy Thumbprint Appetizers
Now that we’ve got our ingredients ready, let’s dive into the fun part—making these cheesy thumbprint appetizers! It’s a straightforward process that’ll have your kitchen smelling amazing in no time. Just follow these steps, and you’ll have a delicious snack to share (or keep all to yourself, no judgment here!).
Preheat the Oven
First things first: preheat your oven to 350°F (175°C). This step is super important because it ensures that your appetizers bake evenly and become beautifully golden. Trust me, you don’t want to skip this part!
Mix the Cheese Filling
While the oven is heating up, grab a mixing bowl and combine the softened cream cheese, shredded cheddar, grated Parmesan, chopped parsley, garlic powder, and black pepper. Use a spatula or a fork to blend everything together until it’s creamy and well mixed. The aroma at this stage is just heavenly!
Prepare the Dough
Next, roll out your refrigerated dough on a clean surface. Use your hands to form small balls, about the size of a tablespoon. Place these dough balls on a baking sheet lined with parchment paper, leaving a little space between each one so they can expand while baking.
Create Indentations
Now for the fun part—using your thumb (or the back of a spoon) to create an indentation in each dough ball. Press down gently, but don’t go all the way through! Just enough to make a nice little well for the cheese filling.
Fill with Cheese Mixture
Time to fill those cute little indentations! Spoon the cheesy mixture into each thumbprint, being careful not to overfill. You want just the right amount to ooze out a bit while baking—yum!
Bake and Cool
Pop the baking sheet into your preheated oven and bake for about 15-20 minutes. Keep an eye on them; you want them to be golden brown and slightly puffed up. Once they’re done, take them out and let them cool for a few minutes. This is the hardest part, but trust me, they’re worth the wait! Serve warm, and watch them disappear!
Why You’ll Love This Recipe
- Bite-sized Bliss: These cheesy thumbprint appetizers are the perfect size for popping into your mouth—ideal for parties or a cozy night in!
- Easy to Make: With just a few simple steps, you can whip these up in no time. Even if you’re a beginner, you’ll feel like a pro!
- Customizable: Feel free to get creative! You can experiment with different cheeses, herbs, or even spices to make them uniquely yours.
- Perfect for Any Occasion: Whether it’s game day, a holiday gathering, or just a casual get-together, these appetizers are always a hit.
- Amazing Flavor: The combination of creamy cheeses and fresh herbs creates a flavor explosion that’ll leave everyone coming back for more.
- Quick Cleanup: Using refrigerated dough means less mess in the kitchen, making cleanup a breeze!
Tips for Success
To ensure your cheesy thumbprint appetizers turn out perfectly every time, here are some of my favorite tips and tricks!
- Don’t Overmix the Filling: While you want everything to be well combined, overmixing can make the filling too airy and affect the texture. Just mix until everything is nicely blended.
- Watch the Baking Time: Every oven is different, so keep an eye on your appetizers as they bake. You’re looking for that lovely golden brown color—if they start to brown too quickly, you might need to rotate the pan or lower the temperature slightly.
- Allow for Cooling: After baking, let them cool for a few minutes before diving in. I know it’s tempting to eat them right away, but letting them cool a bit helps the filling set and makes them easier to handle.
- Experiment with Fillings: Don’t be afraid to mix things up! Try adding different herbs or spices to your cheese mixture. A pinch of cayenne or some chopped sun-dried tomatoes can elevate the flavor even more!
- Use Parchment Paper: Lining your baking sheet with parchment paper not only makes cleanup easier but also helps prevent sticking. Trust me, it’s a game-changer!
- Keep Dough Cold: If your dough gets too warm while you’re working with it, it can be hard to shape. If needed, pop it back in the fridge for a few minutes before rolling into balls.
Following these tips will help you create cheesy thumbprint appetizers that are not only delicious but also visually appealing. Enjoy the process and have fun with it!
Variations on Cheesy Thumbprint Appetizers
One of the best things about these cheesy thumbprint appetizers is how easily you can customize them to match your taste or to use what you have on hand. Here are some fun ideas to switch things up!
- Cheese Swap: Instead of cheddar, try using mozzarella for a milder flavor, or go bold with blue cheese for a tangy twist. You could even mix in some feta for a Mediterranean flair!
- Herb Heaven: Get creative with your herbs! Fresh basil or chives can add a delightful freshness. If you’re feeling adventurous, a sprinkle of dill can give a unique flavor profile that pairs beautifully with the cheese.
- Spicy Kick: If you love a little heat, add some diced jalapeños or a pinch of crushed red pepper flakes to the cheese filling. It’ll give your appetizers a zesty surprise that guests will rave about!
- Savory Add-Ins: Think about mixing in some cooked bacon bits or sautéed mushrooms for an extra layer of flavor. These hearty additions can really elevate your thumbprints!
- Seasonal Flavors: For a fun seasonal twist, try adding pumpkin puree and a sprinkle of nutmeg in the fall or sun-dried tomatoes and fresh basil in the summer for a bright, vibrant taste.
- Sweet and Savory: Feeling adventurous? Try adding a touch of honey or a dollop of fig jam on top of your cheesy filling before baking. The sweet and savory combination is simply divine!
These variations will keep your cheesy thumbprint appetizers exciting and fresh every time you make them. Don’t hesitate to experiment and find your perfect flavor combination!
Storage & Reheating Instructions
Okay, let’s talk about how to store those delightful cheesy thumbprint appetizers and keep them tasting as good as when they first came out of the oven. If you happen to have any leftovers (which is a big if because they’re so tasty!), here’s what you need to do:
- Storing: Allow the cheesy thumbprints to cool completely before storing them. This helps prevent condensation, which can make them soggy. Once cooled, place them in an airtight container. They’ll stay fresh in the fridge for up to 3 days. Just make sure to separate layers with parchment paper if you stack them!
- Freezing: If you want to save some for later, these little bites freeze beautifully! Place them in a single layer on a baking sheet to freeze them individually, then transfer to a freezer-safe bag or container. They can be frozen for up to 2 months. Just label the bag with the date, so you know when to enjoy them!
Now, when it comes to reheating, you want to keep that cheesy goodness intact:
- Oven Method: Preheat your oven to 350°F (175°C). Place the thumbprint appetizers on a baking sheet and cover them loosely with aluminum foil to prevent over-browning. Heat for about 10-15 minutes, or until warmed through. This method keeps them nice and crispy!
- Microwave Method: If you’re in a rush, you can use the microwave, but be careful! Place a paper towel under your thumbprints and heat in short bursts of 15-20 seconds until warm. Just know that they might lose a bit of their crispness this way.
By following these storage and reheating tips, you can enjoy your cheesy thumbprint appetizers even days after making them, without sacrificing flavor or texture. Happy snacking!
Nutritional Information
Curious about what’s in these cheesy delights? Here’s a handy breakdown of the estimated nutritional values per serving (that’s one cheesy thumbprint appetizer!). Keep in mind that these values are approximate, and can vary based on the specific ingredients you use:
- Calories: 100
- Fat: 7g
- Saturated Fat: 4g
- Unsaturated Fat: 2g
- Trans Fat: 0g
- Cholesterol: 20mg
- Sodium: 150mg
- Carbohydrates: 8g
- Fiber: 0g
- Sugar: 1g
- Protein: 3g
So, there you have it! These cheesy thumbprint appetizers are not only delicious but also pretty manageable on the calorie front. Perfect for indulging without the guilt! Enjoy every savory bite knowing you’re treating yourself to something tasty yet not over the top. Happy cooking!
FAQ About Cheesy Thumbprint Appetizers
Got questions about making these scrumptious cheesy thumbprint appetizers? I’ve got you covered! Here are some common queries and my answers to help you out:
Can I make the filling ahead of time?
Absolutely! You can prepare the cheese filling a day in advance. Just store it in an airtight container in the fridge. When you’re ready to bake, let it sit at room temperature for a few minutes to soften before filling the dough.
What if I don’t have fresh parsley?
No worries! If you’re out of fresh parsley, you can use dried herbs instead. Just remember that dried herbs are more potent, so use about a third of the amount of dried herbs compared to fresh. Oregano or Italian seasoning could be great alternatives!
Can I use a different type of dough?
Definitely! While I love refrigerated dough for its convenience, you can use puff pastry or even homemade dough if you’re feeling adventurous. Just keep an eye on baking times, as they may vary based on what you choose.
Do these appetizers freeze well?
Oh, for sure! They freeze beautifully. Just make sure they’re completely cooled before freezing. Store them in a single layer first, then transfer to a container or bag for longer storage. They’ll be just as delicious when you reheat them!
How do I know when they’re done baking?
You’ll know they’re ready when they’re golden brown and slightly puffed up! If you’re unsure, a gentle poke in the center should feel firm, but not hard. Keep an eye on them in the last few minutes—no one wants over-baked appetizers!
Can I make these gluten-free?
Absolutely! Just swap out the refrigerated dough for a gluten-free version. Many brands offer gluten-free dough that works perfectly for these appetizers. Just check the packaging for any specific instructions.
What’s the best way to serve these?
I recommend serving them warm, right out of the oven! You can even garnish them with a sprinkle of additional herbs or a drizzle of sauce, like a tangy balsamic reduction, for an extra touch.
Got more questions? Feel free to reach out! I’m here to help you enjoy every cheesy bite of these delightful appetizers!
Print
Cheesy Thumbprint Appetizers: 7 Irresistible Flavor Combos
- Prep Time: 15 minutes
- Cook Time: 20 minutes
- Total Time: 35 minutes
- Yield: 24 appetizers 1x
- Category: Appetizer
- Method: Baking
- Cuisine: American
- Diet: Vegetarian
Description
Cheesy thumbprint appetizers are bite-sized snacks filled with cheese and herbs.
Ingredients
- 1 cup cream cheese, softened
- 1 cup shredded cheddar cheese
- 1/2 cup grated Parmesan cheese
- 1/4 cup fresh parsley, chopped
- 1/2 teaspoon garlic powder
- 1/4 teaspoon black pepper
- 1 package refrigerated dough
Instructions
- Preheat your oven to 350°F (175°C).
- In a bowl, mix cream cheese, cheddar cheese, Parmesan, parsley, garlic powder, and black pepper.
- Roll dough into small balls and place them on a baking sheet.
- Make an indentation in each ball using your thumb.
- Fill each indentation with the cheese mixture.
- Bake for 15-20 minutes until golden brown.
- Let cool slightly before serving.
Notes
- Experiment with different cheeses.
- Serve warm for the best flavor.
- Store leftovers in an airtight container.
Nutrition
- Serving Size: 1 appetizer
- Calories: 100
- Sugar: 1g
- Sodium: 150mg
- Fat: 7g
- Saturated Fat: 4g
- Unsaturated Fat: 2g
- Trans Fat: 0g
- Carbohydrates: 8g
- Fiber: 0g
- Protein: 3g
- Cholesterol: 20mg
Keywords: Cheesy Thumbprint Appetizers